First Aid-Lesson 3-ARC, CRP and DRSABCD
ARC
ARC, the Australian Research Council, is a Commonwealth entity established as an independent body under the Australian Research Council Act 2001 and reports to the Minister for Education.
CPR and AED
More details of CPR and AED will be delivered in the unit HLTAID009.
According to the ARC guidelines, the term CPR stands for Cardiopulmonary Resuscitation. According to the Australian Resuscitation Council, CPR training should be completed at least annually.
The correct hand position and depth of compression when performing CPR are the lower half of the sternum (breastbone) in the centre of the chest at the nipple line – 1/3 chest depth. The correct chest compression-to-breath ratio is 30 compressions to 2 breaths. The correct rate of chest compressions is 100 to 120 times per minute.
An AED (Automated External Defibrillator) is a portable, easy-to-use medical device that analyses heart rhythms during sudden cardiac arrest and delivers an electrical shock if necessary to restore a normal heartbeat.
Use an Automated External Defibrillator (AED) immediately when a person has collapsed, is unresponsive, and is not breathing normally (or is only gasping). These are signs of sudden cardiac arrest, where the heart stops beating effectively. AEDs are safe for anyone to use, as they only deliver a shock if needed.
Simple guide of using an AED
- Check and Call: Check for responsiveness and breathing. Call 911.
- Turn on the AED: As soon as it arrives, turn it on and follow the voice instructions.
- Prepare the Chest: Expose the patient’s bare chest. Dry it if wet and use the included razor if the chest is very hairy.
- Attach the Pads: Apply the adhesive pads as shown in the pictures on the pads/machine (one on the upper-right chest, one on the lower-left side).
- Analyse and Shock: Ensure no one touches the patient to allow the AED to analyse the rhythm. If a shock is needed, shout “clear” and press the button.
- Continue CPR: Immediately resume CPR after the shock or if no shock is advised, following the machine’s prompts.
If applying an AED to an infant, you should ensure that the pads do not touch each other. The Paediatric pads are used if available (placed on the front of the chest/middle of the back), and the child is unconscious and not breathing normally.
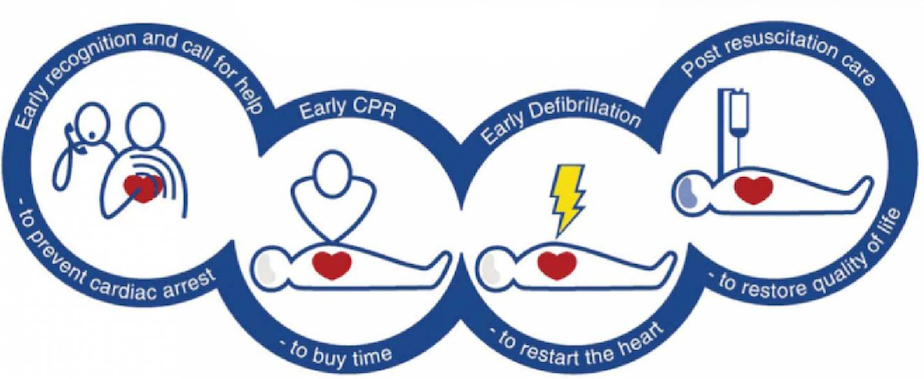
Chain of survival
The Chain of Survival is a sequence of critical, time-sensitive actions designed to maximise survival chances during a sudden cardiac arrest (SCA). The core steps include immediate recognition and activation of emergency services, early cardiopulmonary resuscitation (CPR), rapid defibrillation (AED), advanced life support, and post-arrest care.
Primary survey
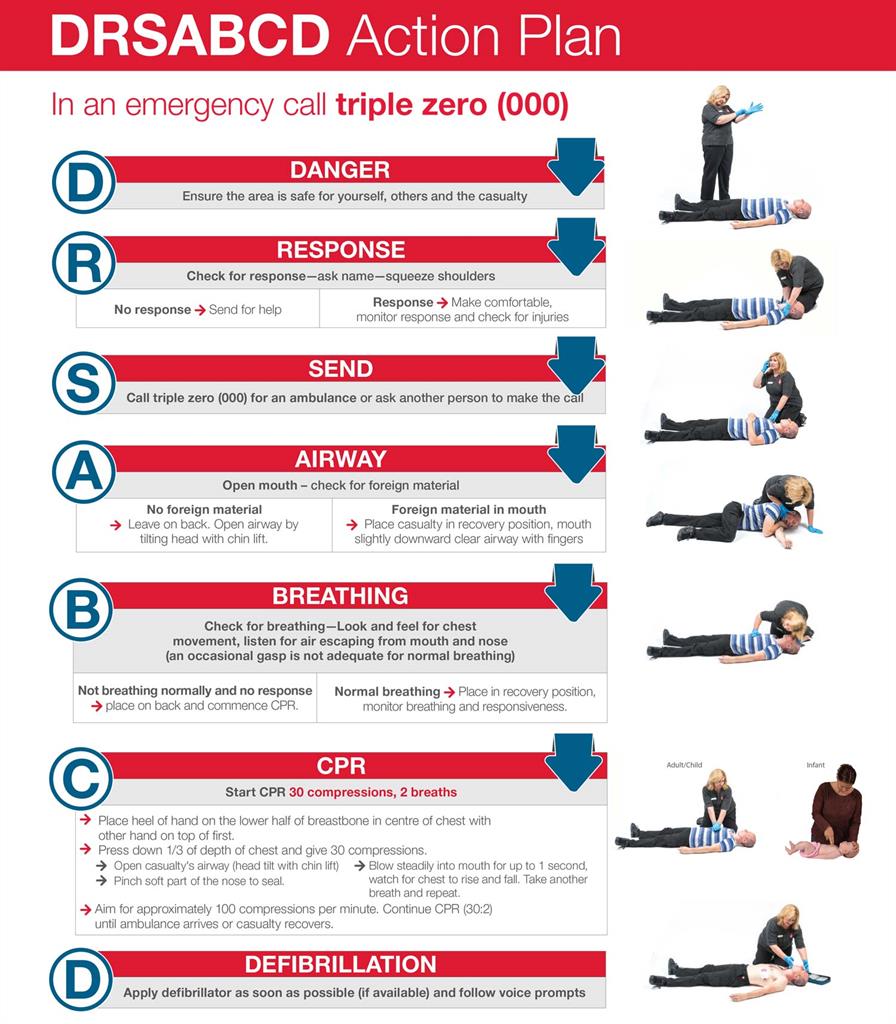
The emergency action plan is based on six basic steps: Danger (Safety), Response, Airway, Breathing, Compression and Defibrillation (DRSABCD). Everyone needs to consider the information involved in the care and treatment of casualties in an emergency.
Secondary survey
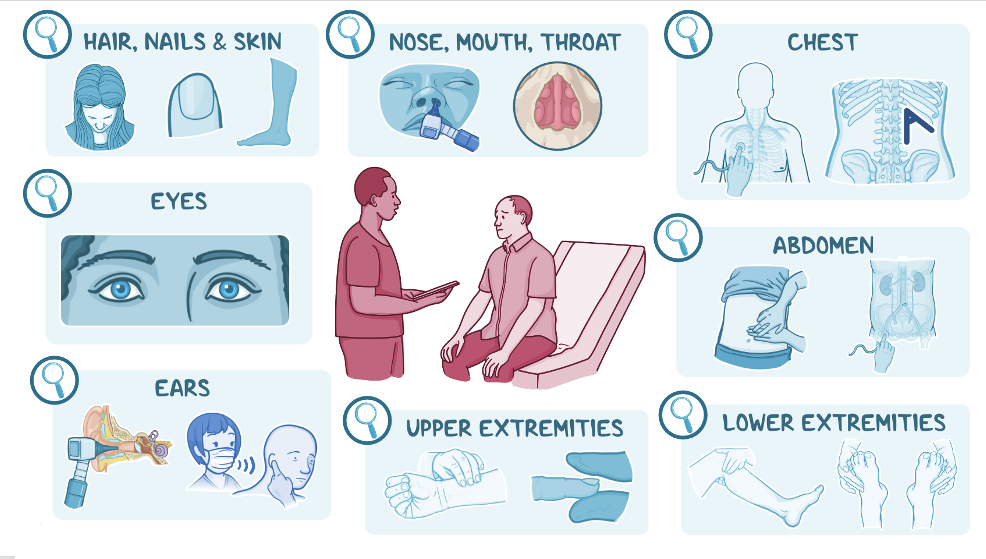
If the casualty has responded to us, then we do not need to check their airways, although we do need to investigate what is wrong. The secondary survey consists of two parts – verbal questioning using the SAMPLE acronym and a visual assessment, which is the “head to toe” physical assessment.
Once consent has been gained from the casualty to proceed with a head-to-toe assessment, we use this to collect information. Does the casualty have a medic alert piece of jewellery that they are wearing that would identify any conditions?
Head – inspect for any bleeding and obvious deformity. Check the ears for blood, fluid or bruising. Check the eyes for reactivity to light and equal-sized pupils. Check the nose for bleeding or deformity. Check the mouth for missing teeth, clench their teeth (to see if the top meets the bottom), and anything blocking the airway. Listen to them speaking for any hoarseness or other abnormalities. Palpate the skull, feeling for any soft, boggy areas or crepitus.
Neck – inspect for any bruising, bleeding or deformity. If trained, palpate for a carotid pulse.
Chest – inspect for equal rise and fall, paradoxical movement (normally, when you breathe in and out, your chest rises and falls respectively. With paradoxical movement, you breathe in, and your chest falls; breathe out, and your chest rises. This is indicative of a flail chest injury. bleeding, bruising, and accessory muscle use (think asthma). Palpate for tenderness and crepitus.
Abdomen – inspect for bruising, bleeding, penetrating injuries, distention, and priapism (spinal injury). Palpate for pain/tenderness, guarding, rigidity, rebound tenderness (this is when you push down, no pain, release suddenly, and they have pain).
Pelvis – inspect for bruising, bleeding and deformity. Palpate for tenderness along the bone, but DO NOT SPRING THE PELVIS (i.e. push down on both sides of the pelvis. If they have a pelvic fracture, this will make things a whole lot worse).
Arms and legs – inspect for bleeding, bruising, deformity, and range of motion. Palpate for strength/weakness, sensation/touch/temperature, pulses, crepitus.
Back – inspect for bleeding, bruising, and deformity. Palpate for pain/tenderness.
Now that we’ve had a good look at our patient, they may have identified some pain during your inspection and palpation. It’s important to really question your patient about their pain, as this can provide valuable information.
Expanded Learning Materials
Expanded
Learning
Materials